Librem5 - A custom squeekboard keyboard tutorial

I wanted to write up how I found the solution to creating a truly custom L5 squeekboard keyboard for my own needs.

The problem I had was needing to create a customized squeekboard keyboard layout that was not related to an ISO639 language. An example is an Old English keyboard that has various unicode characters.
(If you venture into this project and want to make use of some unicode fonts, make sure to install the junicode font package. sudo apt install junicode)

I’d like to say that creating a custom squeekboard layout is a really simple process that is very intuitive. Nice job Purism.

When reading squeekboard’s sparse documentation, there were a few clues that made me realize my problem was about to get more technical.
Specifically in the squeekboard tutorial document

Find the correct name of the .yaml file associated with that input source.

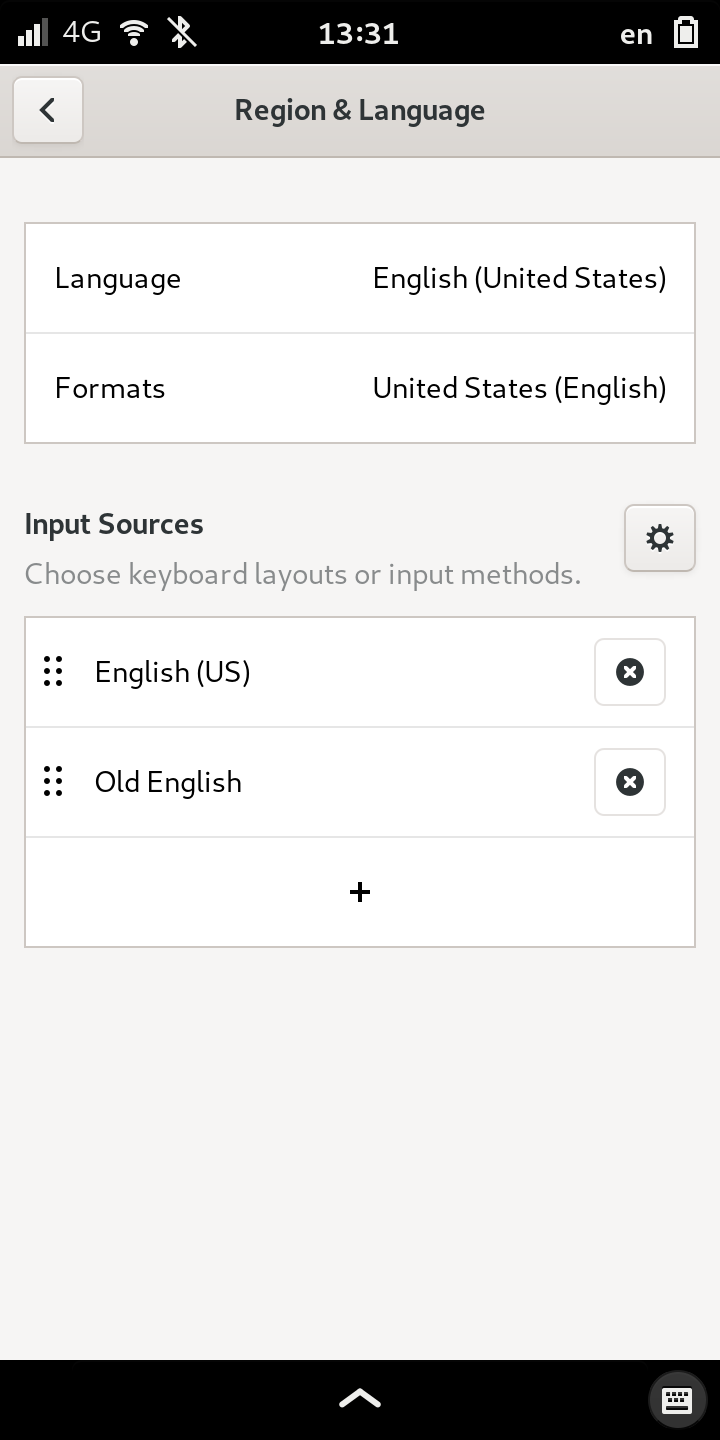
You must match the squeekboard keyboard layout with the name of the input sources selected in Settings → Region & Language → Input Sources. This is they key for creating a custom keyboard - you first have to create a custom Input Source.

So, how does one create a custom input source in GNOME?
After searching online for any related issue, I came across this blog post from Daniel Paul O’Donnell titled Custom Keyboard in Linux/X11.

The blog post describes this process on Ubuntu 8.04/8.10 for X11, but the necessary step for GNOME on Wayland still works.

The only section in this blog post that is necessary for our purposes is “X11/xkb/rules/evdev.xml (>= Ubuntu 8.10)” https://people.uleth.ca/~daniel.odonnell/blog/custom-keyboard-in-linuxx11#e. In case the blog site goes down, I’ll quote it here:

To add a keyboard layout to X11/xkb/rules/evdev.xml (i.e. for use in Ubuntu 8.10 and higher):
Open X11/xkb/rules/evdev.xml in an editor
Go to the end of the <layoutList> section (search for </layoutList>). Add the following after the last </layout> tag, where x is the file name of your keyboard layout in X11/xkb/symbols (in my case Old English); y a suitable short name (in my case English philologist); z an appropriate long name in one or more languages (in my case English philologist), and aaa a legal three letter (ISO 639-2) language code (e.g. eng for English) (Do not leave spaces between the tags and the names you are using: the system still works if you do, but there are display issues):

       <layout>
         <configItem>
           <name> x </name>
           <shortDescription> y </shortDescription>
           <description> z </description>
           <languageList>
              <iso639Id> aaa </iso639Id>
           </languageList>
         </configItem>
         <variantList/>
       </layout>

On the Librem5, the XML file described in the blog post is located here: /usr/share/X11/xkb/rules/evdev.xml.
The location of the </layoutList> element tag is around line 6320.
Command to open file in nano (on Librem5):
sudo nano --linenumbers --autoindent +6320 /usr/share/X11/xkb/rules/evdev.xml

Enter a new <layout> element (and its children), like the one below in this XML file to create a custom Input Source. I used “eng” in place of “aaa” in his blog post description but added a name and a description. The <name> element value will be the name of your squeekboard layout yaml file.

Here’s the XML for an “Old English” example:

<layout>
  <configItem> 
    <name>oldeng</name>
    <description>Old English</description>
    <shortDescription>oe</shortDescription>
    <languageList>
      <iso639Id>eng</iso639Id>
    </languageList>
  </configItem>
</layout>

Notes:

  • The <name> value is the name of the associated squeekboard .yaml file and will show up in the top right of your status bar.
  • The <description> value is what shows up in the Input Source list under the ISO 639 list entered in the <languageList> section. It is also what sets the keyboard title in the “globe” selector in squeekboard.

Once you update the evdev.xml file, you’ll find your new custom Input Source in Settings → Region & Language → Input Sources. Select it as an Input Source.

Then create your custom squeekboard layout file in .local/share/squeekboard/keyboards/<name>.yaml
touch ~/.local/share/squeekboard/keyboards/oldeng.yaml
Populate the file, using the examples in the squeekboard repository as a template. data/keyboards/us.yaml · master · World / Phosh / squeekboard · GitLab
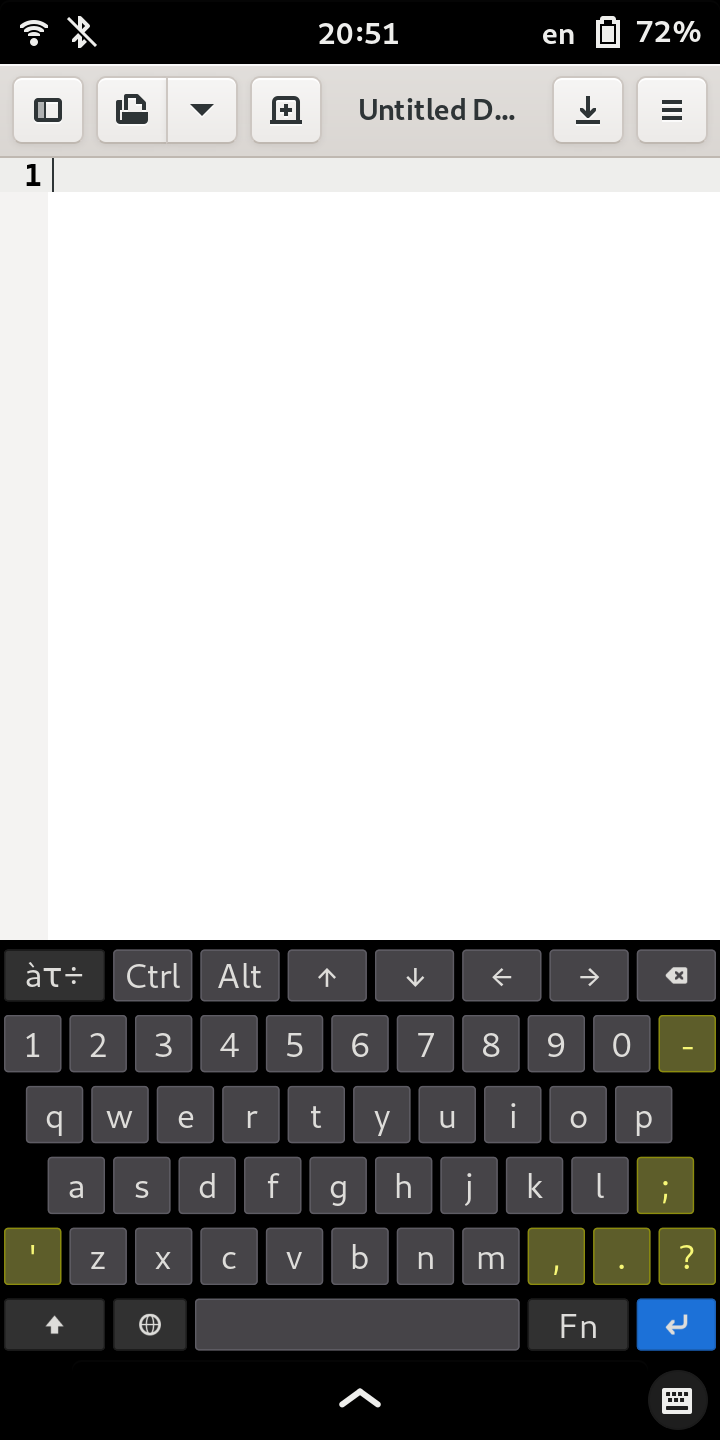
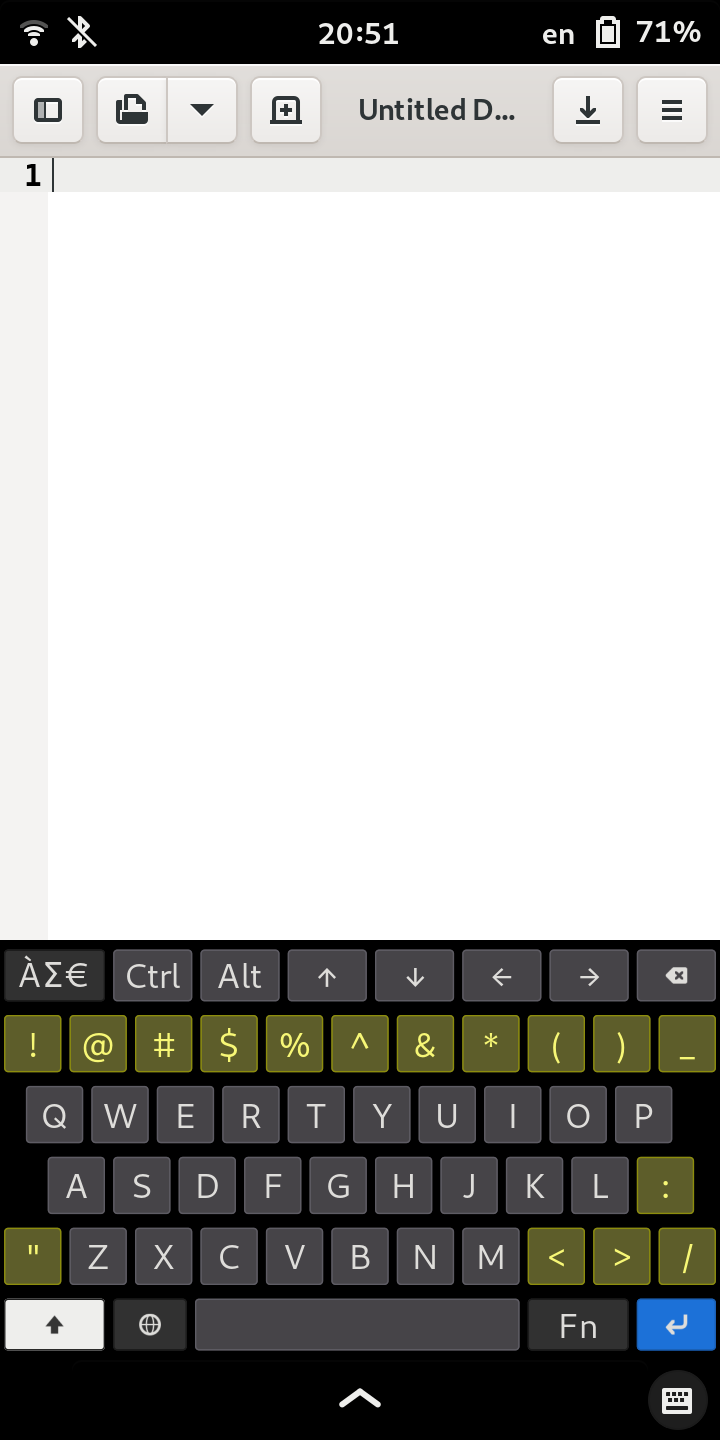
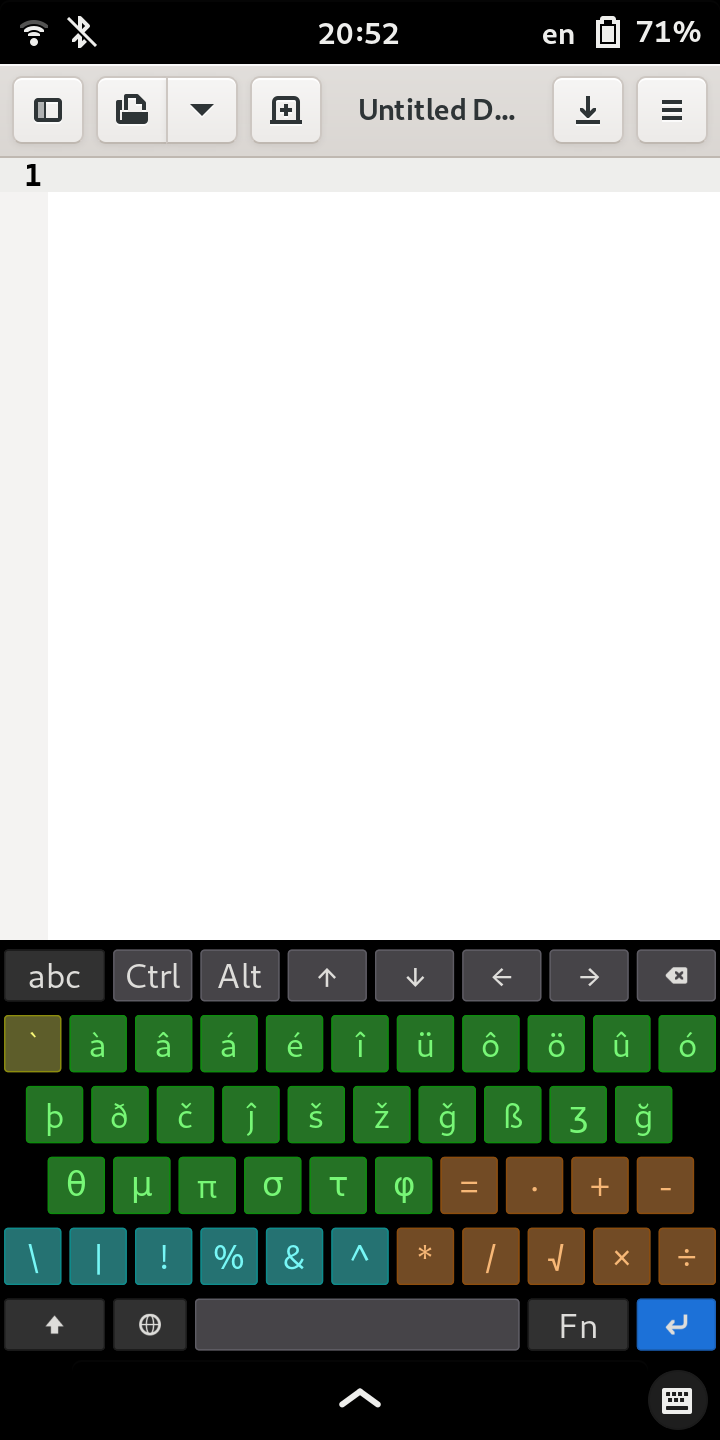
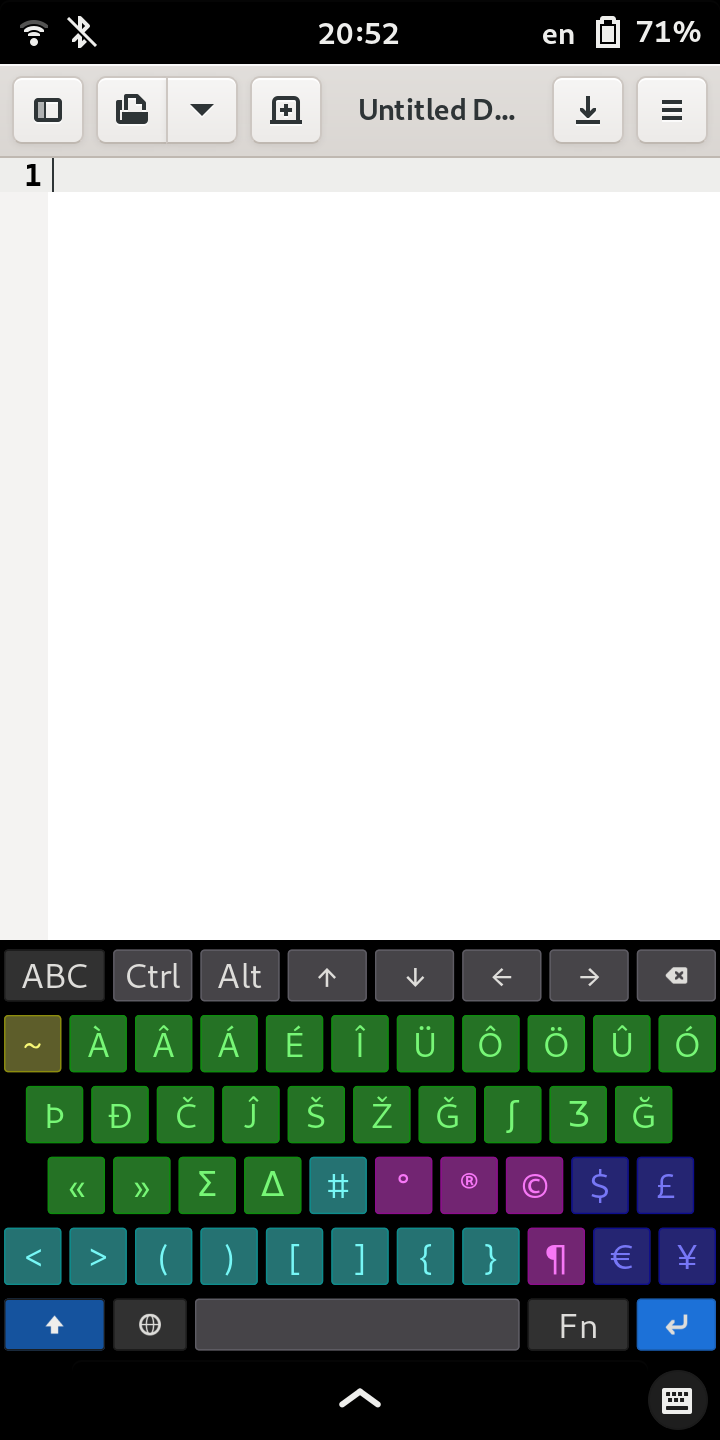
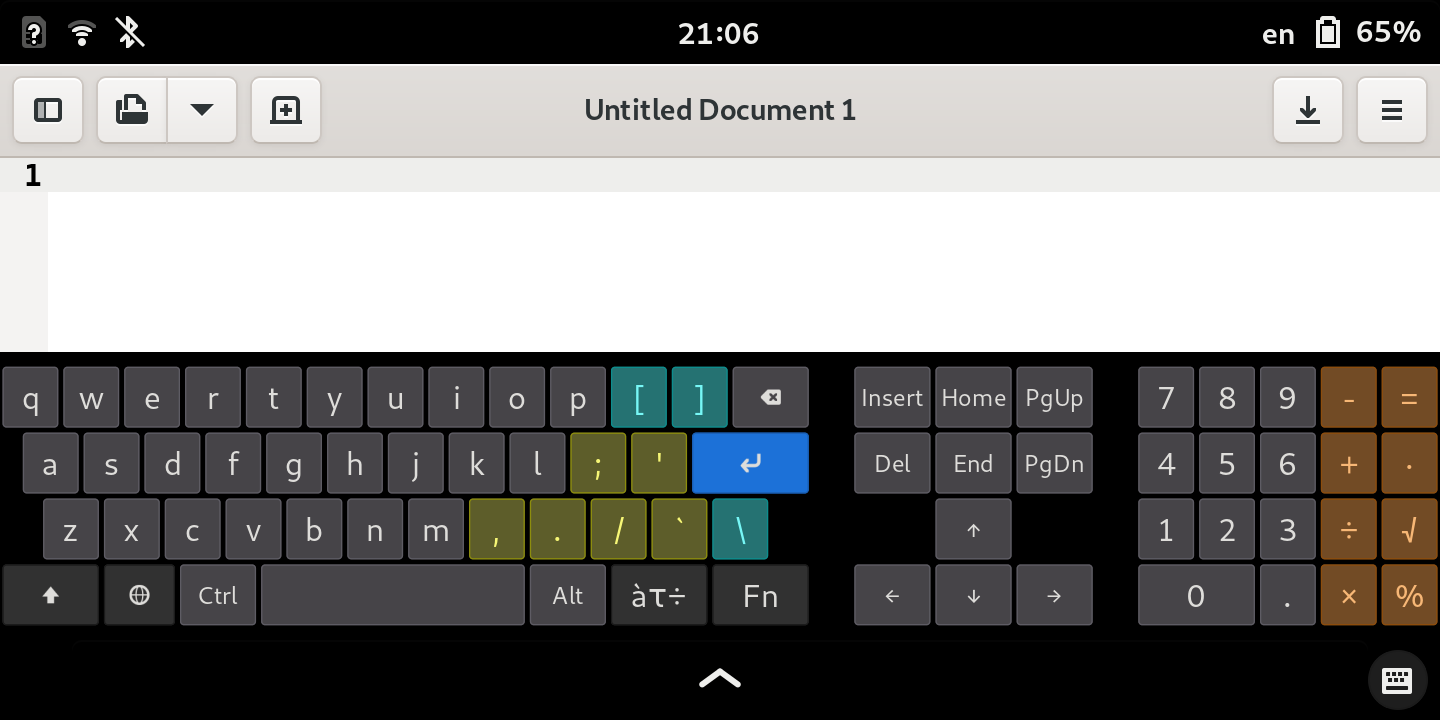
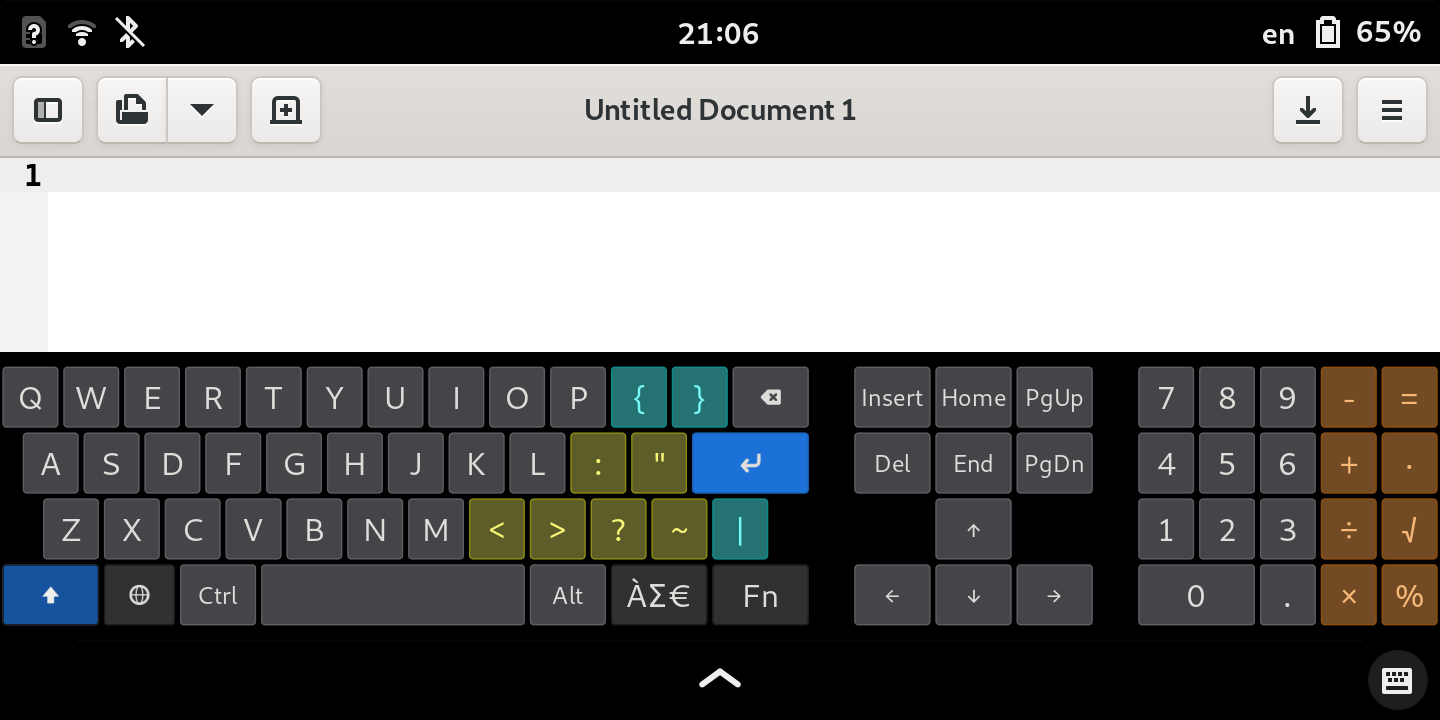
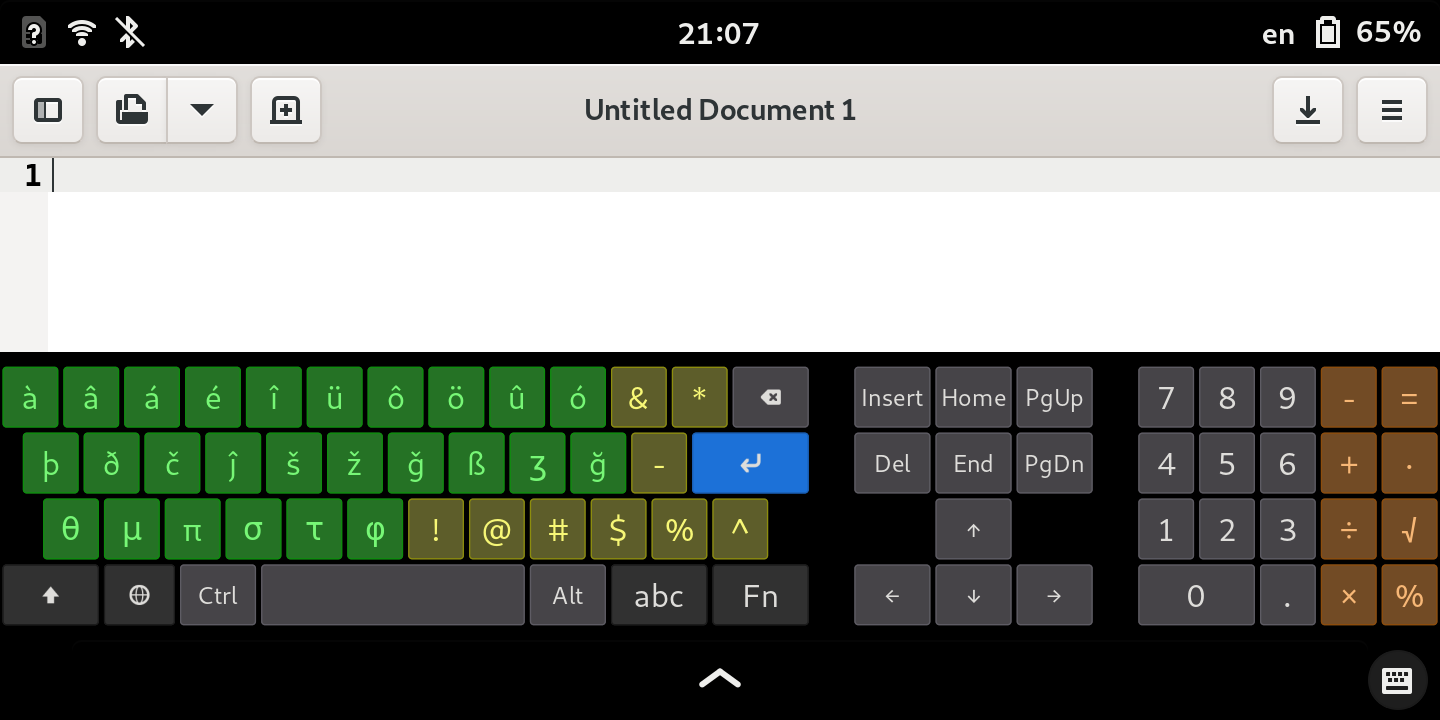
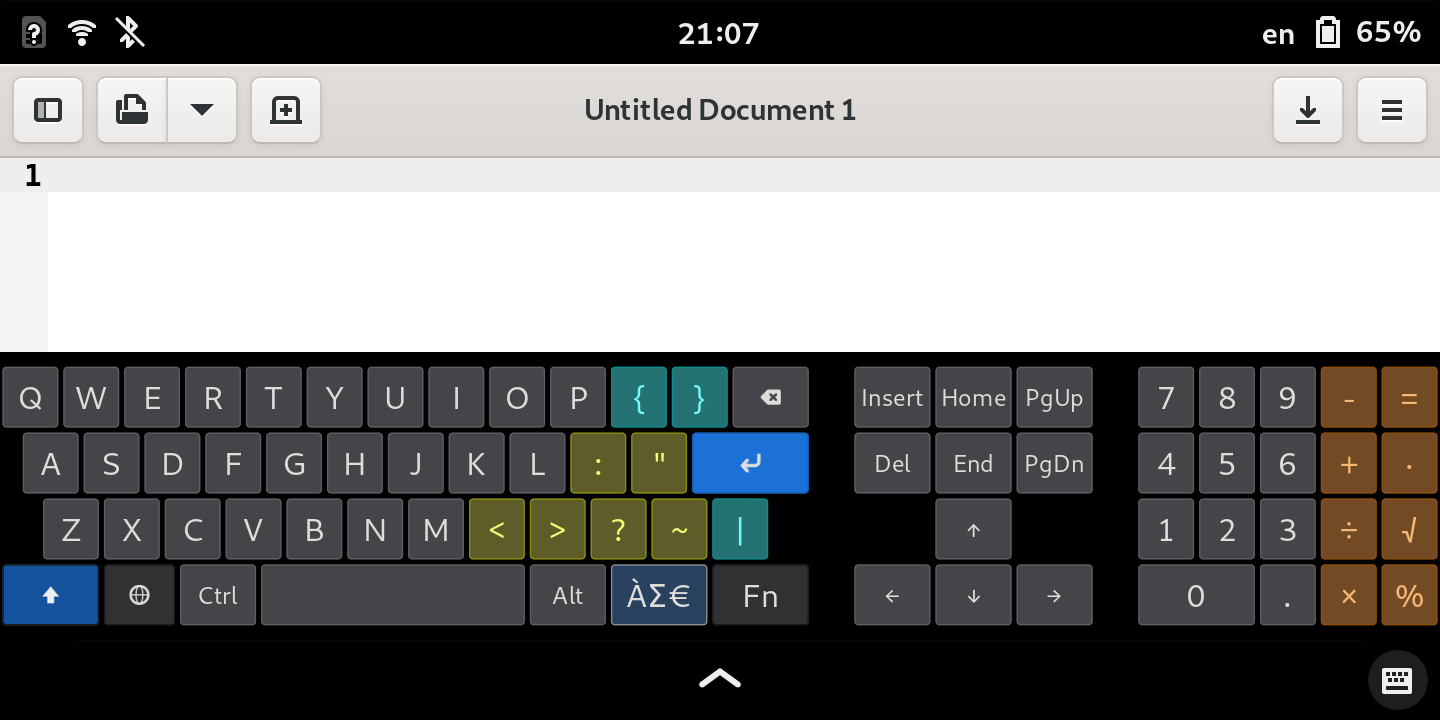
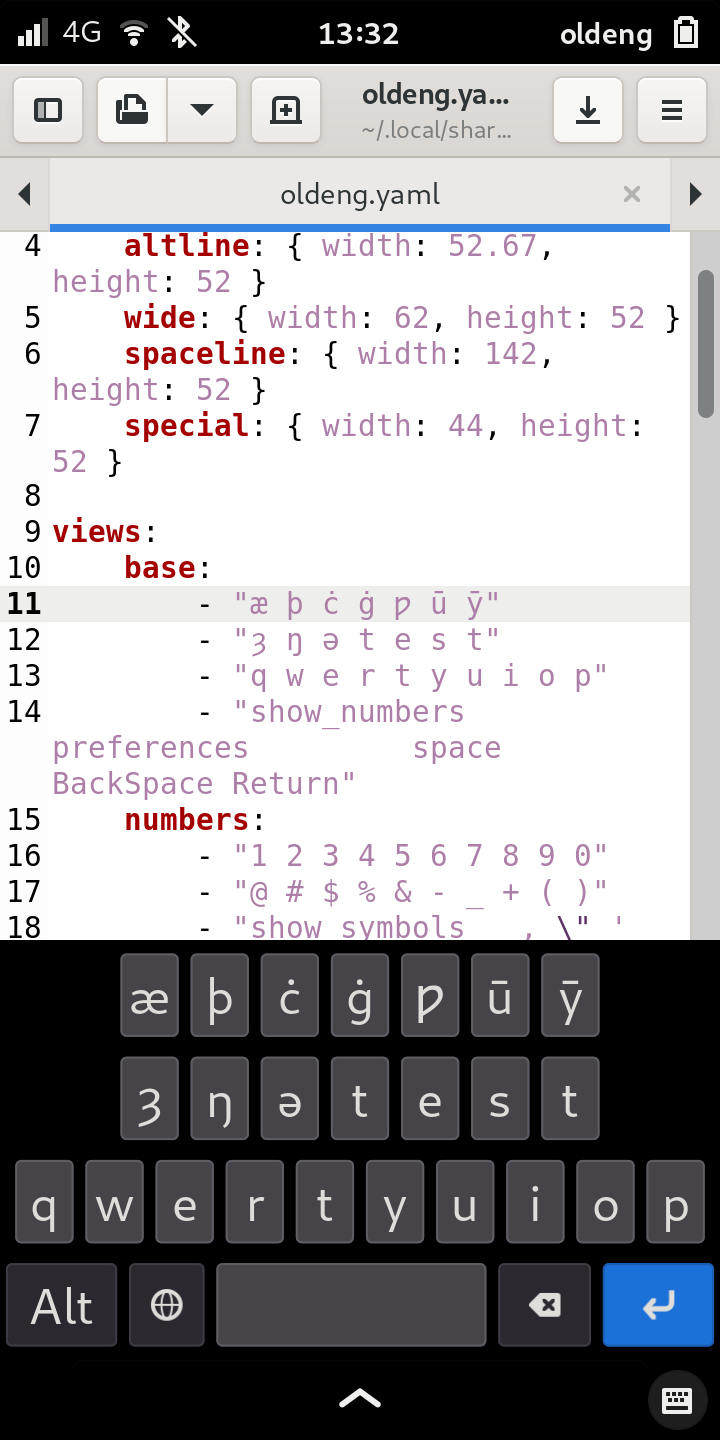
Copy / paste your unicode characters, emoji or other characters into the .yaml file key rows and they will be shown in the keyboard when you select it. Customize your keyboard to your exact desires.

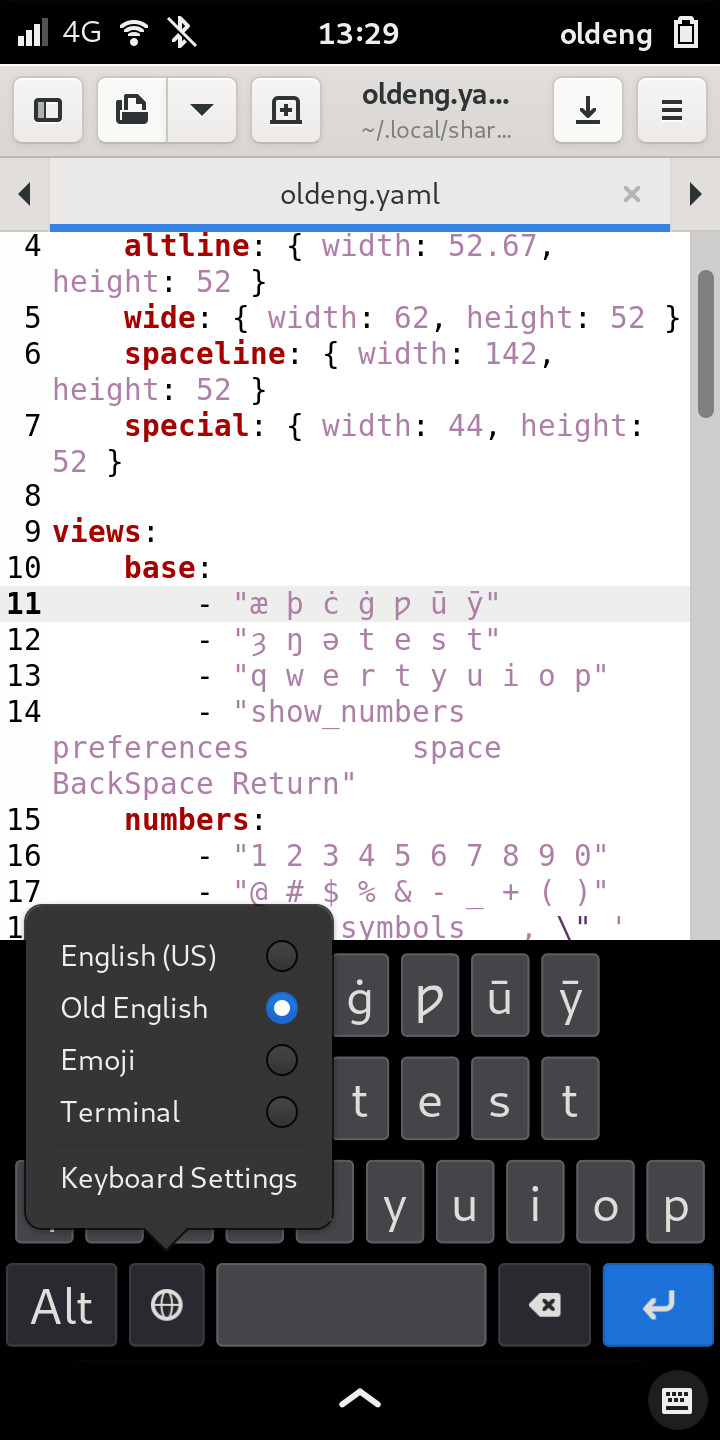
Once squeekboard is on screen, you can select your new custom keyboard by clicking the globe icon to the left of the spacebar.


If you try this out, please let me know if there are issues or better ways to complete the task described here.

Happy typing!

17 Likes

As it happens, I’ve been doing something similar. In my case, though, I wanted to replace the default US English keyboard (not having 0-9, a period, and arrow keys available drives me nuts), so part of my situation was less complex than yours; I did not need to create a new input, just override one that already existed.

So I just needed to put a us.yaml file into the appropriate directory on the phone. (In fact, I needed to create the directory.) Once that’s done whatever default is compiled into squeekboard is overridden. The directory is ~/.local/share/squeekboard/keyboards.

Incidentally when the phone is in landscape mode, it will want to read us_wide.yaml, not us.yaml. So realistically, you need to do this twice, but the advantage is you can truly take advantage of the wide layout in landscape mode if you want, by rearranging things differently.

(If you want to override the keyboard that shows up when using the terminal app, you’ll want to drop a us.yaml file into ~/.local/share/squeekboard/keyboards/terminal. I would NOT do this until you have a satisfactory keyboard file for “normal” use however. I also don’t know how many languages are supported there; it may be that a replacement terminal file must be named us.yaml or fr.yaml.)

I don’t know the pixel dimensions of the landscape keyboard area (it’s 1440 pixels wide), but the portrait mode ones appear to be 720px by about 300px. You don’t need to really sweat this. When you define your keyboard, inside the file it will have an implicit width x height and it will be shrunk (or expaned) as big as it can be and still fit (keeping proportions the same).

The .yaml file is largely intuitive. I suggest you start with the current us.yaml (or whatever is appropriate for your language/locale). At the top is a section where you define a number of “outlines” giving a pixel width and height. As far as I know you pretty much need a “default”. There are a couple that are hard-wired (almost) to look different, “altline” will be a darker color for instance, so will “wide” though here you can change their sizes all you want. (Controlling color is an additional complication; I ended up needing multiple sizes of those dark colored keys…I’ll get into that below.

Then below that you lay out “views” with either a series of characters per line like this:

  • “q w e r t y u i o p”
  • “a s d f g h j k l ;”

or the names of keys, which you’ll define below, e.g, “- BackSpace Space Ctrl”

You can define multiple views and in fact even a simple keyboard will probably have lower and upper case.

The last section of the file associates an “outline” with every key given. Simple character keys like “a” and so on, if they do not appear here, will use the default style (whatever size you defined it as in the top section, and a grayish color). If you want to override this for some character (say you want “Z” on a key the size of the spacebar for some reason), you can head an entry in this section with “Z”: (including the quotes). Most of the keys listed here in the default file are “named” keys like BackSpace, you can see the syntax there.

Pay attention to the way Shift_L is set up, this key has the complex behavior of “latching” on one press (it switches to the other view, generally “uppercase” of some kind, the name of that view is specified here, but then after ONE key is pressed, it switches back) versus “locking” after two presses (remaining in the other view until pressed again).

From this file I was able to set up the “base” view (lower case with numbers across the top, and arrow keys above even that, much like the terminal keyboard except I made them taller), and an upper case view (which includes the symbols that you get from shift 0 through shift 9)… I created a key whose job it was to switch to symbols views, there’s an “upper” and “lower” case symbols view in my version as well (I have about 15 accented letters plus common Greek letters in those views; with upper case versions of the accented letters being in the upper case symbols view." Finally there’s a fifth view full of function buttons and the like, largely stolen (but rearranged) from the Terminal view.

I made the top row (arrow keys, ctrl, alt, backspace, and the key to go to symbols (or back to alpha from symbols) slightly shorter than the other row, I did likewise with the keys on the bottom row (space bar, settings, return, etct). I tried (and largely failed) to make the keyboard “short” compared to its width so I wouldn’t be constantly be hitting ^ when I was trying for the space bar…

All those keys required new outlines. And sometimes I wanted my new outline to be dark like altline and wide are. That in turn meant I wanted control over the key colors.

As far as I know there’s no inheritance in the .yaml file. So as far as I know, I couldn’t define “short_altline” to be just like “altline” but a different size (which would cause it to inherit the color of altline).

Changes to your .yaml file will take effect when the file is saved. If you start an app after saving the file, it will read the new file when it wants a keyboard. Or, if already in an app, you can switch back and forth to a different keyboard, when you come back to your original keyboard you should see your changes.

In ~/.config/gtk-3.0/gtk.css you can work with key colors. This file didn’t get distributed with your phone but an old version of it can be found here: data · master · Librem5 / squeekboard · GitLab (puri.sm) [the file style.css is the one you want, rename it as gtk.css then edit it.]

This is like the yaml file in one respect: There are apparently hard-coded values in squeekboard, but this file, if present, will override them ( you have to restart the phone to get changes to take).
Caution: I do not think the colors for the shift key here are the same as what is actually in squeekboard. (I can barely see a difference between the lock-shifted up arrow and the arrow on the latched shift key; one is dark blue and the other is black; I ended up redoing these for more contrast. The default with no css file is more visible.)

I ended up adding all sorts of outline names to the same place where "altline"s colors are specified so that they’d be the same color. (I also created new colors for keys that had, for instance, punctuation or foreign characters on them, just so they’d stand out–that’s a frill, though, not necessary at all. These all have the same size as default in the .yaml file.)

squeekboard will center each row of keys; if they are of different widths, it will look somehting like center-justified text. I got around this by defining outlines that are black on black with black outlines in the .css file, then creating do-nothing keys (keysym " ", text " ") of those outlines and putting them in wherever I wanted gaps. In this way I was actually able to stagger keys with A slightly below and to the right of Q, and so on, by creating a spacer outline one third the width of the default. (I used 48 for the width of default, but you could use any number divisible by 3 if you want to do this.)

So the result is my us keyboard has shift-to-symbols, Ctrl, Alt, the four arrows, and backspace across the top row. I made all of those keys wider than default (and shift-to-symbols is darker) so it spans the entire width. This row is a bit shorter than the normal. The second row contains 1-9, then zero, then dash (-) with the dash colored because it’s punctuation. All default size. The third row has a 1/3 spacer in front, then qwertyuiop, then a 2/3 spacer, that gives it the “staggered” look. The fourth row is “asdfjhijkl” plus semicolon (;), it has a 2/3 spacer to the left and a 1/3 spacer to the right (again to help the staggered look). The fifth row has no spacer, but has a single quote (colored) [this would normally go to the right of the semicolon, but there’s no space there–fortunately the color makes you notice it in its odd location], then z-m, the comma, period and question mark. [A real keyboard has / here with the ? being what you get when you shift, but I use the ? a lot more texting than the / so I swapped them.]. The bottom row is shorter keys, the shift, settings (little globe–DO NOT OMIT THIS KEY!!! and please note this is the only thing I felt I had to shout), space bar, Key to go to the functions view, and return. Other views are laid out identically; the upper case keyboard’s symbol key takes you to the upper case symbols (and vice versa).

Result: I have numbers and arrows and the most common types of punctuation all on my home view.

5 Likes

And in case you want to make a study list of every unique Old English word in, oh, I dunno, Beowulf, check this out: Script to Extract List of All Unique Words in a Text, plus Frequency
:rofl:

1 Like

I’m glad you were able to customize squeekboard to your liking. Do you have a screenshot of your work? I think I got the gist but a visual would be nice.
I didn’t realize there was a *_wide.yaml landscape layout, that’s great to have too.

OK, that was a learning experience. No obvious way to do a screen shot, so I searched and discovered a command line tool named grim; that and a sleep command let me do what I wanted…except that in landscape mode grim inverts the picture (regardless of which way I turn the phone into landscape). So after transferring it to my desktop, I got to run gimp to rotate the pictures 180 degrees.

Anyhow…Here is the base view, and uppercase view, in portrait mode.

followed by the symbols views (lower and upper case)

And here’s the function key view.

Now for landscape, base and uppercase:

symbols in landscape:

And finally the functions.

9 Likes

That looks really nice! I love the wide mode layout the best, it’s basically a full keyboard.

You’ll have to report back on your typing accuracy. I have trouble hitting the correct keys on the default keyboard as it is. Typing long passwords is a chore, especially if you get it wrong a few times.

My L5 comes with a screenshot package that I used for my post. I’m not sure of the name to install. Maybe it comes in librem5-goodies? I’m not sure.

Thanks for sharing your setup!

I just squeezed a 12 pixel tall “dummy” invisible spacer under the space bar on the portrait mode; I decreased the height of the two short rows by two pixels each to make some space for it. I basically did that so a near miss on the space bar wouldn’t send whatever app I was in to whatever they call that place where they’re loaded but not active. THAT is frustrating when it happens, you hit spacebar and your app zooms away…

1 Like

Thanks to a prior comment of yours for giving me the clue. I went looking for librem5-goodies, which does indeed have the screen shot in it. It’s based on grim, though, and still takes the pictures in landscape mode upside down, just like my command line hack (sleep 5; grim [filename]). (I also found it unintuitive to use the screen shot…where’s the “OK this is fine, now start the timer” button? I don’t know what I actually did to trigger it, but by the time I realized the five seconds were counting down, it was too late to show the keyboard.

This is pretty awesome, thanks. I’ve also come up with a nonstandard layout https://gitlab.gnome.org/World/Phosh/squeekboard/-/merge_requests/541 but had no idea how to register it with the system. Now I know how!

I’m not sure if system-wide installation should be the only way to do it, but I don’t have better ideas.

BTW, I recently updated the docs with the description of the layout language: https://world.pages.gitlab.gnome.org/Phosh/squeekboard/

2 Likes

Besides Take Screenshot (part of librem5-goodies), there is also GNOME Screen Shot, which has slightly different controls, including a manual Save button instead of just the countdown to autosave. (Neither of them should invert your landscape keyboard, though…not sure what’s happening there.)

grim doesn’t just invert the keyboard, it inverts (rotates 180) the entire image. And the distributed file viewer doesn’t have a button to rotate the image and save it (like Microshaft’s does).

Has anyone else used grim (or Take Screenshot) and NOT had it rotate the image?

@dcz, do you know the exact pixel dimensions of the keyboard area in both portrait and landscape? (I’m aware that whatever you create will be shrunk/expanded to fit with it “letterboxed” top and bottom left or right if the layout aspect ratio isn’t the same as the area; but I’d rather use the area than waste it so I’d want my layout to have the same proportions.)

Landscape is 540x310 IIRC. The exact dimensions are embedded in the us layout in the form of button dimensions.

Oh wow, it does. I never observed that before. I did have issues with landscape mode in Millipixels, though, with the image rotating 90 degrees to the right when I wanted to take a photo in landscape mode. Turns out I just should have turned the camera sideways without having screen rotation turned on. That’s a different issue, though.

Thanks for the pointers to that documentation; I had never seen it before. (There’s a page often pointed to on the wiki which is very incomplete and doesn’t even talk about the hints; it was enough to get me started but my knowledge had gaps in it.)

540x310 Landscape? Did you mean portrait (vertical)?

From what I saw the actual screen dimensions of a librem are 1440 x 720 pixels, so the portrait keyboard is 720 wide by some unknown number tall in actual pixels. If the ratio you gave is correct, the vertical pixel height should be 413 1/3. I learned pretty quickly (and the docs say) that whatever size in units your keyboard totals out to, it will be expanded or shrunk to fit in whatever rectangle Squeekboard uses. I tried simply adding another row, expecting the keyboard to cover more of the screen to accommodate it, instead the entire keyboard shrank to fit the 413 (?) pixels, and it was now too narrow with black areas on either side. Conversely removing rows so the keyboard covers less of the screen (which would be useful in landscape mode!) just makes the keys larger. In general, if your keyboard is relatively wide compared to its height, you get “letterboxing” above and below it (like watching a 16:9 movie on a 4:3 TV [if any of those even exist any more!], if it’s too narrow, you get black on the sides like watching an old 4:3 DVD on a 16:9 TV.

I was after the aspect ratio of the area both in portrait and landscape; now I know the ratio is 54:31 in portrait mode (but still don’t know landscape). My portrait layout is 528 units wide (16x33, and the default key is 48 units wide, so there can be 11 of them across; the spacers I use for the staggered effect are 16 and 32 units wide)

I really wish it were possible to change the aspect ratio (ideally the app would compute it from the file and only take up the appropriate vertical real estate), especially in landscape mode, where the current app consumes over half the screen. A wide format should be, maybe, 20 keys across and two keys high, and cover much less of the screen.

Anyway, now that I know the portrait mode aspect ratio, I can go back to my layout and ensure it’s 528 x 303 (by adjusting the height of the keys) to maximize usage of the area. That’s as close as I can get to matching 54:31.

Yeah, I mixed it up. Here the proportions come straight from code:

                    if abstract_width < 540 {
                        // Normal
                        Rational {
                            numerator: 210,
                            denominator: 360,
                        }
                    } else {
                        // Wide
                        Rational {
                            numerator: 172,
                            denominator: 540,
                        }
                    }

That’s work in progress. Currently camera support takes priority though, so it won’t be solved soon.

1 Like

Thanks! Will get some good use out of that. Looks like, reduced, it’s 12:7 portrait, and 135:43 landscape…my portait mode keyboard should be 528x308 units. (I actually didn’t total up the landscape one at all, now I can do so intelligently.)

That is looking awesome, very nice work :+1: :100:

Are the layouts fully functional and are you willing to share them?
I’m very interested in trying them out.

I have been using those layouts (and I tinkered with them a bit more yesterday, consolidating styles and fixing things so that I don’t have to define a whole bunch of additional “dark key” styles like altline in the CSS page (CSS is where you alter colors)).

Basically, I named these styles us.yaml, us_wide.yaml, and so on, so they’d replace the “hard coded” styles.

I have no idea where an appropriate place would be to upload them, nor whether I need to rename them somehow.

The latter set 172 x 540, doesn’t seem right…my landscape layout is clearly at least 4 times as wide as it is tall (see my screen shots) and seems to fill the panel almost perfectly (it should be a bit wider). Is it possible something else (other than the code you excerpted) affects it?