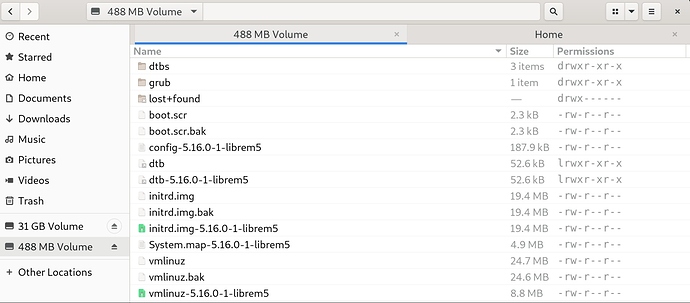
Just to be prepared for a real crisis, I trained today the described procedure with an own compiled uuu and jumpdrive on an Ubuntu 20.04.3 LTS laptop. I had to start the process with sudo ./boot-purism-librem5.sh and after a short moment of transfer the L5 showed this screen:
All fine as it should and the process took only a minute or so. Well, now I’m prepared for the real disaster :-).
I should add that the screenshot was taken by my 12 years old son, the owner of this Ubuntu laptop. I’ve less or no idea about Ubuntu desktop, I do FreeBSD with KDE.
Great, thanks for showing that. I guess it’s a good idea to build/install uuu and jumpdrive and test it in that way, for similar reasons that you keep a spare tire in the trunk of your car.
@MV71, with: sudo fdisk --list you should recognize right partition that you are about to work with (mine is currently /dev/sdb1):
Device Boot Start End Sectors Size Id Type
/dev/sdb1 * 10240 962559 952320 465M 83 Linux
Please adjust this recommendation (if/as needed):
I have the Jumpdrive running but I’m not able to ‘adjust’ commands like these. I’m not able to use terminal; I’m using a Ubuntu live from USB ( I don’t have other choices); with sudo fdisk -l it shows me a lot of partitions, a mess for me… and I don’t want to add a second disaster…
So I’m not able to follow/apply the others following instructions…
I can only trust in the help of an italian user…
[quote=“MV71, post:184, topic:16245”]
Bus 001 Device 001: ID 1d6b:0002 Linux Foundation 2.0 root hub @MV71, with: sudo fdisk --list you should recognize right partition that you are about to work with (mine is currently /dev/sdb1):
Device Boot Start End Sectors Size Id Type
/dev/sdb1 * 10240 962559 952320 465M 83 Linux
Make sure with that you are in right directory with: ls -lh and proceed with:
This was the very key step we’ve been looking for, very positive side. Great achievement (while using other Linux distro), the one that you are, from now on, familiar with (not hidden for you any more).
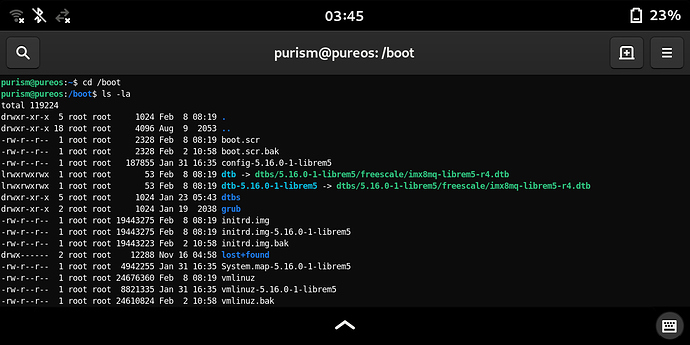
I’ll let myself talk less and attach two very same pictures (from inside of the phone and when mounted with: ./boot-purism-librem5.sh to my laptop, actually through Jumpdrive for the Librem 5 smartphone) showing initrd.img, etc. files you are about to work, through Terminal app, with (but do not use, please, Nautilus or other GUI programs for any purpose now and here other than showing ‘related directory‘, afterwards usable of course for …):
/dev/sdX1 is actually the first partition (on Librem 5 eMMC) with the only one/direct directory (not counting sub-directories that are present there) called /boot. You already found needed two files, therefore like to confirm here, that those are: /boot/initrd.img and /boot/vmlinuz, found them by using either ls -la or ls -lh command (through Terminal).
EDIT:
@MV71, actually those two files are, for our purpose here, by strictly following “my” previous advice(s): initrd.img and vmlinuz found directly under /mnt directory: cd /mnt ls -lh sudo rm initrd.img sudo rm vmlinuz sudo mv initrd.img.bak initrd.img sudo mv vmlinuz.bak vmlinuz sudo apt remove linux-image-5.13.0-1-librem5 sudo flash-kernel sudo umount /dev/sdX1
One by one, please, disconnect your Librem 5, remove its BPP-L503 battery and insert it back to power on Librem 5 without any further worries (relax for quite some time, as such bridging to the brand new Linux Kernel is very rare thing that never happened before, at least I never saw one with the long term support Linux distribution, and I do not expect any similar one in future either.) Purism Team mastered this one quite easily, in comparison to what all other tasks they already mastered and that they are actually still mastering … here was about our active involvement … our indeed small involvement (as I wrote here: in comparison). We learned few very useful things hard way confirming that we are in charge of our smartphone … open source software smartphone.
Only due to technical interest, could some kind soul shed a bit light on how uuu and jumpdrive work exactly together. I imagine, that uuu copies over the USB from the PC some mini kernel to the L5, which is set by the procedure of the volume button and battery insert in some kind reader mode and then starts the mini kernel in memory, which then offers the partitions of the eMMC as USB devices and starts some TELNET daemon… Something like that must the procedure, or not?
I don’t know how many more of these failed-update customers we are going to get but wouldn’t it make sense for the instructions in post #14 just to include the sudo ?
Where it is unnecessary, it should be harmless. Where it is necessary, it should avoid a lot of grief for already-flustered customers.
Big disclaimers apply as I haven’t looked at any code but:
The procedure with the volume button puts the Librem 5 in “serial downloader” mode. (lsusb output on the host will be different, as compared with a normally booted Librem 5 that is plugged into a host via USB.)
The procedure with the battery is not usually relevant or necessary but is sometimes needed in obscure cases, according to @dos.
In serial downloader mode, commands and data can be sent by a USB-connected host to the Librem 5. That of course needs some client software on the host. That client software is uuu
uuu is capable of many things but one of those things is transferring a bootable image over USB and having the Librem 5 boot it. One such bootable image is “Jumpdrive”.
“Jumpdrive” configures the USB device at the Librem 5 end to advertise one (or two) USB mass storage class devices (disks) and some kind of network device (sorry, details not in front of me). If you have a uSD disk inserted then it will advertise two disks, otherwise just the one (the eMMC drive). Yes, it configures a network interface and starts a telnet daemon.
(Handling of partitions is just standard functionality on the host.)
From having watched the build, for 5 hours , the Jumpdrive kernel is fairly comprehensive. Once you telnet in, you would expect most things to work normally. So you should be able to mount the disk(s) locally - if you didn’t mount them on the host - and wander around the directory tree. However I can’t give an account of what things are missing and what things are included.
That is not something that we are thrilled about, but in the interest of reducing friction in the case of users that are not doing this from a PureOS install, ok, done
Pretty much. Booting the phone up while Vol+ button is held puts it into USB download mode, at which point you can load the bootloader from a PC over the USB port. uuu is used to do that (boot u-boot), and also to communicate with that loaded u-boot instance so you can flash things or load them into memory and boot from there. That’s what Jumpdrive’s uuu script does - it loads u-boot, then uses it to load a kernel and initramfs into RAM and tells it to boot it from there.
Once Jumpdrive boots (which is pretty much just Linux with a small initramfs that contains Busybox and bunch of scripts), it displays the splash screen, exports eMMC and SD card over USB as mass storage devices, sets up serial console and Ethernet (also over USB) and runs a telnet daemon.
Technically, you don’t need to do the battery dance, but the instructions tell you to do so because it increases the chances of it working in some edge cases, like battery being flat, or SoC being stuck in some weird state. This helps because of the LED feedback you get when there’s no battery in - so you can match the LED output you see with the instructions and know that things are going well, there’s enough power available for phone to actually run etc. Without that, there’s no indication of progress, as the only feedback USB download mode gives that informs you it actually booted into USB download can only be seen over USB, so if you don’t see it on your PC you’re pretty much in the dark and figuring out why it’s not working is mostly trail-and-error. With these slightly more annoying instructions, we can at least weed some common failure cases out early (that said, I never take the battery out to put my phone into flashing mode - once you’re familiar with the device enough to recognize which state it’s in by yourself there’s not much reason to do so)
Hi,
Excuse me about my English, it’s not my best skill.
After an update few weeks ago, my L5 doesn’t detect the Hardware-Kill-Switches when I turn them on. I suppose the solution describe here could help me, so I try to access to my L5 through jumpdrive but I’m stuck.
I am on Kubuntu 20.04, I try the process on an Archlinux and a Kubuntu 21.10, every time I reach this state :
ailonn@ailonn-Oryx-Pro:~/librem5/jumpdrive » sudo ./boot-purism-librem5.sh
[sudo] Mot de passe de ailonn :
uuu (Universal Update Utility) for nxp imx chips – libpureos/1.2.91+0git6b465-0pureos+librem5.2-1-g5e5fee8
I don’t think it is correct that this solution is applicable for you. The solution described here is for a Librem 5 that effectively can no longer boot i.e. you can’t even login to the phone.
So if you switch off all three Hardware Kill Switches and boot up, do you get the login screen (PIN pad for entering your PIN)? If you get the login screen and you can login then this topic is not for you.
If this topic is not for you then building uuu and building Jumpdrive would be a lengthy digression. Building uuu is not necessary in more recent versions of Ubuntu anyway i.e. not necessary for Ubuntu version at or after 21.04.
@ailonn, turn-off every HKS! Now please reread and proceed as described in above posts (here) #174, #175, #176 and:
Step 2, take your Librem 5 battery out and connect Librem 5 per cable to your laptop by holding Volume-key up and inserting its battery back (actually connecting back needed power would mean that currently used battery is already charged to over 50%, at least not empty). New you need to execute: lsusb and ensure you are reading this line:
Step 3, if you read text, actually output, as above and only then you should proceed and press Enter-key: sudo ./boot-purism-librem5.sh.
Explanation:
is some unknown version to me and it should read like something closer to this (when possible and as initially described in this post): uuu (Universal Update Utility) for nxp imx chips -- lib1.4.77
Therefore (as not really sure which version you are actually using), and before you proceed with above steps please (re)follow this official guidance:
P.S. I’ll check your progress today (but it might happen to be very late).
Hi ! Thank you very much for your detailed answer !
I already took the time to do the different steps with the correct uuu version through snap or apt and with the battery dance. But the script stays blocked.
My main problem is to have my phone detect the changes on the HKS when this problem is fixed then I will dig in the forum, or I will create a new topic, to fix my problem with uuu and jumpdrive .
I bookmark your answer with your tips on the battery level charge and wait the purism support answer.
Thanks you for your time and the precision of your answer.
The support team ask me to try this protocol to solve my issue.
I tried with your tips @Quarnero : the correct uuu package and the battery with 60% charge. I met the same issue as describe in my first post. L5 light yellow and boot-purism-librem5.sh script block in the state below:
@ailonn, as first thought of mine or another conscious approach, as based on @irvinewade post, please remove your microSD (if inserted) temporarily away.
My second thought here is that using shorter/another USB Type C cable will provide more current/power if your PC/laptop USB port (as mentioned in above post) doesn’t provide (through particular USB-C cable) at least 0.5A (just my guess, perhaps ensuring 5.0V/0.6A from currently used USB port is even better) to your Librem 5, therefore please connect your laptop (if perhaps older type) to its original power supply (should help) during usage of here related procedure.
I’d agree with @dos expert advice as positive and encouraging that you’ll get there eventually, that we hope that you’ll get there, that Jumpdrive will mount your Librem 5 eMMC drive soon. Therefore, and in addition, ensure usage of correctly extracted archive and, please, download this one (again and although the very same 0.8 version one), unpack it to another folder, with another name, and try here related procedure again from that new folder.
Also, after executing: lsusb | grep 8M, by having constant red LED light on, please do not disconnect (if so) USB-C cable from your PC/laptop. Just press Enter-key after typing: sudo ./boot-purism-librem5.sh.
As well, did you try: ./boot-purism-librem5.sh without sudo? Thanks for your feedback!
As still not too late, your System76 laptop description link says: 1 x Thunderbolt™ 4 (please do not use that one at all). Yet, please try here related procedure with this laptop left USB-A (as it provides more power) port (and adequate cable):
As well, here is another post on why not to use Intel® JHL6540 Thunderbolt™3 Controller (as this port provides 15W to bus-powered devices):
Edit: Confirmation command would be something like: $ lspci | grep -i Thunderbolt.
I appear to have had this same issue, so I am here with a question on my twist. My daily driver is Open Suse, so it was bit of a pain getting uuu working, but I got through all that using snap and actually moving the binary file manually. So I connected fine via jumpdrive by downloading and running the script recommended by mladen et. al. All good - I have the three added drives (phone two and my SD card). However, that’s where we hit my odd twist. In the directory, neither “initrd.img” and “vmlinuz” nor their .bak’s are present: