yes it is …
Let us stop here. I’ll think over on what to suggest and you’ll try to resolve that Jumpdrive is running as it should. Please make sure that used USB-C to USB-A cable transfers data well, test this one or another one with some other Android smartphone. We’ll “see” us tomorrow again.
bye and thank you
Sorry I’m late to this party. The error message suggests sudo, does the script have to be run with sudo?
If there are no udev rules installed, then the script needs sudo
Jumpdrive work with me ONLY if I connect the usb cable in the L5 before.
After :
Remove battery
Hold volume-up
Insert the USB-c cable IN THE LAP TOP : (red light blinks, no green light)
Reinsert the battery: (red light is constantly on, the script will continue)
Release volume-up
Yes, I’ve noticed that @pure_fede offers you helping hand, within post #166, please take this advice gladly and continue to focus on points that need to be done by using your native language, please print out @mladen post #14 and follow it as written, and everything will end up as success and great learning experience. Please do not give up on your Librem 5 or on your Ubuntu setup. Quality USB cable might be the critical one, it is component that Librem 5 relies on, also why not to connect it firmly first with your Librem 5, from USB-C side and afterwards with your USB-A side port that hopefully provides at least 5.0V/0.7A (therefore having red LED light constantly on is very important, actually critical “sign”, try another USB-A port on very same laptop. Shorter USB cables are better choice, those that work well with external M.2 SSD drives are good choice, something like this cable A (doesn’t need to be new) or cable B, it is just about very fine communication with your Librem 5 eMMC (etc.).
Connecting USB cable with your Librem 5 phone and AFTERWARDS executing/entering: ./boot-purism-librem5.sh is just fine as well (sorry for my confusion yesterday, and perhaps here as well). BUT, I forgot to advice following that might change your progress dramatically, please try as well (nothing to loose although I’m not expert) :
sudo ./boot-purism-librem5.sh
I’ve entered:
./boot-purism-librem5.sh −− as root user and got:
uuu (Universal Update Utility) for nxp imx chips – lib1.4.77
Success 1 Failure 0
1:1 3/ 3 [=================100%=================] SDPV: jump
3:1 10/10 [Done ] FB: Done
If success as above, please proceed with what written within posts #77 and #78 from @Marts.
Please note three important posts just above this one.
AND, above “sign”, good one, was just about the one that we need (but I wasn’t aware of it until now). Great job from your side, thanks! You are just about to accomplish well this PureOS Linux Kernel upgrade soon.
@MV71, with: sudo fdisk --list you should recognize right partition that you are about to work with (mine is currently /dev/sdb1):
Device Boot Start End Sectors Size Id Type
/dev/sdb1 * 10240 962559 952320 465M 83 Linux
Please adjust this recommendation (if/as needed):
Make sure with that you are in right directory with: ls -lh and proceed with:
Afterwards please execute those two final steps, official recommendations:
sudo umount /dev/sdX1
P.S. Yesterday I have had long day behind myself (and other very important thoughts), but still hope this helps.
Ok, did you contact support (forgive me for not reading all your posts in this thread)? In my experience they’re highly responsive and professional. IIRC, you don’t even have to go through all the steps of reflashing, this problem can be fixed without data loss.
I know, the paragraph is addressed at people who seem to expect a quality that the L5 obviously can’t deliver (yet).
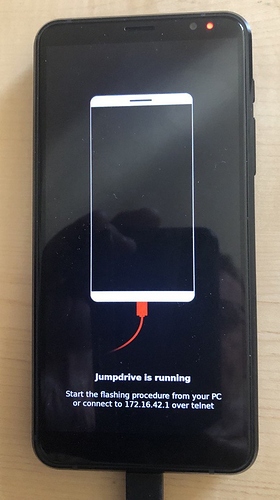
Just to be prepared for a real crisis, I trained today the described procedure with an own compiled uuu and jumpdrive on an Ubuntu 20.04.3 LTS laptop. I had to start the process with sudo ./boot-purism-librem5.sh and after a short moment of transfer the L5 showed this screen:
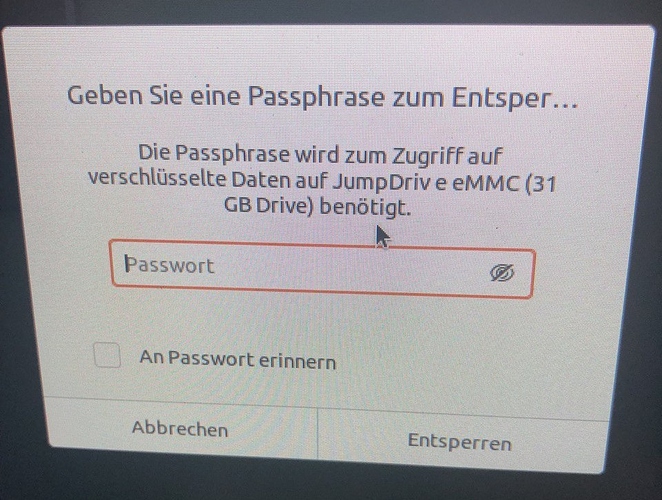
On the Ubuntu desktop a window popped up asking for the normal decrypting passphrase:
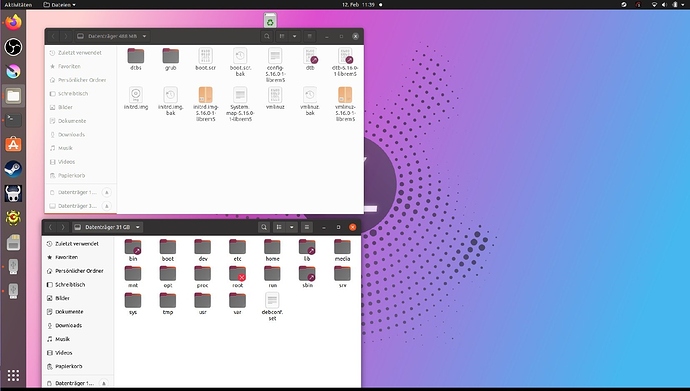
The two L5 eMMC partitions got automounted:
All fine as it should and the process took only a minute or so. Well, now I’m prepared for the real disaster :-).
I should add that the screenshot was taken by my 12 years old son, the owner of this Ubuntu laptop. I’ve less or no idea about Ubuntu desktop, I do FreeBSD with KDE.
Great, thanks for showing that. I guess it’s a good idea to build/install uuu and jumpdrive and test it in that way, for similar reasons that you keep a spare tire in the trunk of your car.
Novadays cars don‘t have this anymore 
@MV71, with: sudo fdisk --list you should recognize right partition that you are about to work with (mine is currently /dev/sdb1):
Device Boot Start End Sectors Size Id Type
/dev/sdb1 * 10240 962559 952320 465M 83 Linux
Please adjust this recommendation (if/as needed):
I have the Jumpdrive running but I’m not able to ‘adjust’ commands like these. I’m not able to use terminal; I’m using a Ubuntu live from USB ( I don’t have other choices); with sudo fdisk -l it shows me a lot of partitions, a mess for me… and I don’t want to add a second disaster…
So I’m not able to follow/apply the others following instructions…
I can only trust in the help of an italian user…
[quote=“Quarnero, post:218, topic:16245, full:true”]
[quote=“MV71, post:184, topic:16245”]
Bus 001 Device 001: ID 1d6b:0002 Linux Foundation 2.0 root hub
@MV71, with: sudo fdisk --list you should recognize right partition that you are about to work with (mine is currently /dev/sdb1):
Device Boot Start End Sectors Size Id Type
/dev/sdb1 * 10240 962559 952320 465M 83 Linux
Make sure with that you are in right directory with: ls -lh and proceed with:
[quote=“Marts, post:78, topic:16245”]
sudo rm initrd.img
Please, to avoid mistake, what do you mean ‘right directory’ at this point?
This was the very key step we’ve been looking for, very positive side. Great achievement (while using other Linux distro), the one that you are, from now on, familiar with (not hidden for you any more).
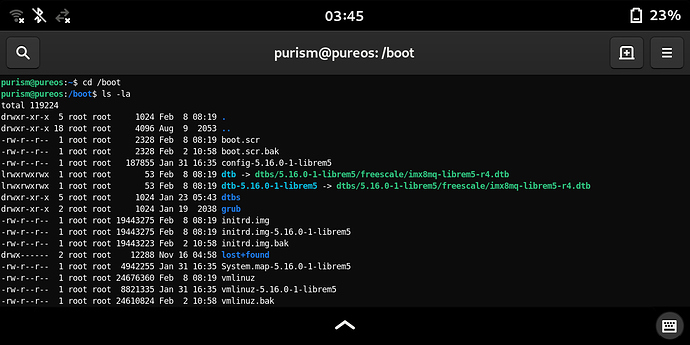
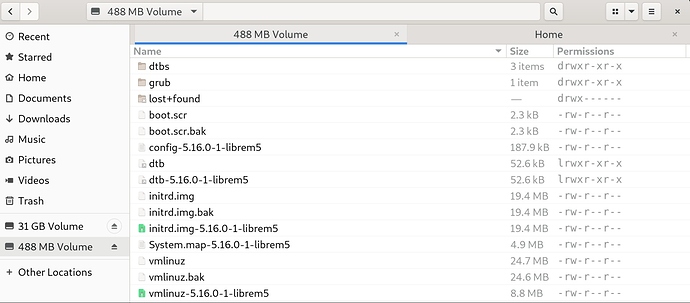
I’ll let myself talk less and attach two very same pictures (from inside of the phone and when mounted with:
./boot-purism-librem5.sh to my laptop, actually through Jumpdrive for the Librem 5 smartphone) showing initrd.img, etc. files you are about to work, through Terminal app, with (but do not use, please, Nautilus or other GUI programs for any purpose now and here other than showing ‘related directory‘, afterwards usable of course for …):/dev/sdX1 is actually the first partition (on Librem 5 eMMC) with the only one/direct directory (not counting sub-directories that are present there) called /boot. You already found needed two files, therefore like to confirm here, that those are: initrd.img and vmlinuz, found them by using either ls -la or ls -lh command (through Terminal).
EDIT:
@MV71, actually those two files are, for our purpose here, by strictly following “my” previous advice(s): initrd.img and vmlinuz found directly under /mnt directory:
cd /mnt
ls -lh
sudo rm initrd.img
sudo rm vmlinuz
sudo mv initrd.img.bak initrd.img
sudo mv vmlinuz.bak vmlinuz
sudo apt remove linux-image-5.13.0-1-librem5
sudo flash-kernel
sudo umount /dev/sdX1
One by one, please, disconnect your Librem 5, remove its BPP-L503 battery and insert it back to power on Librem 5 without any further worries (relax for quite some time, as such bridging to the brand new Linux Kernel is very rare thing that never happened before, at least I never saw one with the long term support Linux distribution, and I do not expect any similar one in future either.) Purism Team mastered this one quite easily, in comparison to what all other tasks they already mastered and that they are actually still mastering … here was about our active involvement … our indeed small involvement (as I wrote here: in comparison). We learned few very useful things hard way confirming that we are in charge of our smartphone … open source software smartphone.
Only due to technical interest, could some kind soul shed a bit light on how uuu and jumpdrive work exactly together. I imagine, that uuu copies over the USB from the PC some mini kernel to the L5, which is set by the procedure of the volume button and battery insert in some kind reader mode and then starts the mini kernel in memory, which then offers the partitions of the eMMC as USB devices and starts some TELNET daemon… Something like that must the procedure, or not?
I don’t know how many more of these failed-update customers we are going to get but wouldn’t it make sense for the instructions in post #14 just to include the sudo ?
Where it is unnecessary, it should be harmless. Where it is necessary, it should avoid a lot of grief for already-flustered customers.
Big disclaimers apply as I haven’t looked at any code but:
The procedure with the volume button puts the Librem 5 in “serial downloader” mode. (lsusb output on the host will be different, as compared with a normally booted Librem 5 that is plugged into a host via USB.)
The procedure with the battery is not usually relevant or necessary but is sometimes needed in obscure cases, according to @dos.
In serial downloader mode, commands and data can be sent by a USB-connected host to the Librem 5. That of course needs some client software on the host. That client software is uuu
uuu is capable of many things but one of those things is transferring a bootable image over USB and having the Librem 5 boot it. One such bootable image is “Jumpdrive”.
“Jumpdrive” configures the USB device at the Librem 5 end to advertise one (or two) USB mass storage class devices (disks) and some kind of network device (sorry, details not in front of me). If you have a uSD disk inserted then it will advertise two disks, otherwise just the one (the eMMC drive). Yes, it configures a network interface and starts a telnet daemon.
(Handling of partitions is just standard functionality on the host.)
From having watched the build, for 5 hours ![]() , the Jumpdrive kernel is fairly comprehensive. Once you telnet in, you would expect most things to work normally. So you should be able to mount the disk(s) locally - if you didn’t mount them on the host - and wander around the directory tree. However I can’t give an account of what things are missing and what things are included.
, the Jumpdrive kernel is fairly comprehensive. Once you telnet in, you would expect most things to work normally. So you should be able to mount the disk(s) locally - if you didn’t mount them on the host - and wander around the directory tree. However I can’t give an account of what things are missing and what things are included.
That is not something that we are thrilled about, but in the interest of reducing friction in the case of users that are not doing this from a PureOS install, ok, done ![]()
Pretty much. Booting the phone up while Vol+ button is held puts it into USB download mode, at which point you can load the bootloader from a PC over the USB port. uuu is used to do that (boot u-boot), and also to communicate with that loaded u-boot instance so you can flash things or load them into memory and boot from there. That’s what Jumpdrive’s uuu script does - it loads u-boot, then uses it to load a kernel and initramfs into RAM and tells it to boot it from there.
Once Jumpdrive boots (which is pretty much just Linux with a small initramfs that contains Busybox and bunch of scripts), it displays the splash screen, exports eMMC and SD card over USB as mass storage devices, sets up serial console and Ethernet (also over USB) and runs a telnet daemon.
Technically, you don’t need to do the battery dance, but the instructions tell you to do so because it increases the chances of it working in some edge cases, like battery being flat, or SoC being stuck in some weird state. This helps because of the LED feedback you get when there’s no battery in - so you can match the LED output you see with the instructions and know that things are going well, there’s enough power available for phone to actually run etc. Without that, there’s no indication of progress, as the only feedback USB download mode gives that informs you it actually booted into USB download can only be seen over USB, so if you don’t see it on your PC you’re pretty much in the dark and figuring out why it’s not working is mostly trail-and-error. With these slightly more annoying instructions, we can at least weed some common failure cases out early  (that said, I never take the battery out to put my phone into flashing mode - once you’re familiar with the device enough to recognize which state it’s in by yourself there’s not much reason to do so)
Hi,
Excuse me about my English, it’s not my best skill.
After an update few weeks ago, my L5 doesn’t detect the Hardware-Kill-Switches when I turn them on. I suppose the solution describe here could help me, so I try to access to my L5 through jumpdrive but I’m stuck.
I am on Kubuntu 20.04, I try the process on an Archlinux and a Kubuntu 21.10, every time I reach this state :
ailonn@ailonn-Oryx-Pro:~/librem5/jumpdrive » sudo ./boot-purism-librem5.sh
[sudo] Mot de passe de ailonn :
uuu (Universal Update Utility) for nxp imx chips – libpureos/1.2.91+0git6b465-0pureos+librem5.2-1-g5e5fee8Success 0 Failure 0
3:1 3/ 3 [=================100%=================] SDPV: jump
The script never stop, the screen is black and the litght is kind of yellow. In this screenshot I build uuu with the instructions from the wiki.
Thanks you to have take the time to read this.
Someone has some tips to help me please ?
I’m available to any comments.
